


How do beginners sell on Click Bank?

How do beginners sell on Click Bank?How do beginners sell on Click Bank?
How do beginners sell on Click Bank?
A Clickbank affiliate model that will work to sell a product and here are the steps-
- Choose a range of Clickbank products in the same niche to promote
- Create a free niche gift eBook
- Create a squeeze page that offers the free eBook
- Send traffic to the squeeze page
- Capture the lead that arrives at the squeeze page
- Distribute autoresponders via email with Clickbank products
- Watch money accumulate in your Clickbank account
Step 1: Choose a series of Clickbank products
The first step to making money with Clickbank is deciding the niche you want to target. Ideally, the niche should be a niche that you have the knowledge and a passion for. If not, then you can still make money with it, but you wouldn’t have as much fun and for me, having fun is even more important than making money.
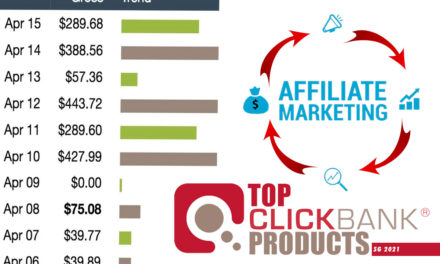
The Clickbank Marketplace lists thousands of products you can promote. You can sort your search results based on commissions, sales, popularity, and a number of other criteria.
Step 2: Create a free eBook
The best way to get people to give you their email addresses is to offer them something they think is helpful for free. This is where the eBook comes into play. You can write it yourself or appoint someone to do that. If you are really cheap, you can use a PLR eBook. They are just like PLR articles but in eBook format. I recommend that you write it yourself or take on the writing. The quality of the PLR leaves a lot to be desired.
The free eBook doesn’t have to be very large, it should be 20 to 60 pages, but it does have to cover the same niche as the Clickbank products you intend to promote. This is why I said you should have some knowledge of the place you intend to address.
Step 3: To promote the eBook, create a squeeze page
A squeeze page is a particular type of landing page created solely to serve as an opt-in for information, primarily email addresses, from potential subscribers. When people visit the blog, they will subscribe to my email list. However, because there is so much to see and read, the number of entries is not as high as possible. By creating a separate squeeze page, your email signup rate can skyrocket.
The easiest way to create a squeeze page is with Unique Blog Designs’ Squeeze theme. This theme is based on WordPress and will support you in designing custom squeeze pages in seconds.
To use Squeeze Theme, all you have to do is pick the theme you desire to go, add the photo, text, your Aweber email codes, or video, and let squeeze theme do. You can hire a designer to design the theme.
Step 4: Send traffic to the squeeze page
Once you have created the squeeze page, you need to send traffic to it. The quickest way to do this is to use pay-per-click or pay-per-view advertising. However, this is also the most expensive way. There are tons of low-cost or free methods for generating traffic. A little creativity can go a long way.
When it comes to building traffic try to think outside the box.
Step 5: Take advantage
Lead acquisition is the essential part of affiliate marketing. Your business is built around your list. Anything you have to do to increase its size proposes more cash for you.
While a squeeze page is perhaps the best way to get someone to give you their email address, you still need a system to manage and host the list. My recommended email service is Aweber. Aweber works perfectly with Squeeze Theme. Its web interface enables you to obtain it from any network, anywhere in the universe.
For all new customers, Aweber gives a $ 1 trial account. The account is just like a regular Aweber account and includes unlimited email campaigns, newsletters, broadcasts, and follow-ups.
Step 6: Deploy Auto Responders
Auto Responders are emails that go out on a set date and interval. When someone subscribes to my blog, a series of autoresponder emails are sent. These emails are designed to do three things.
- Build a relationship with the subscriber
- Promote my blog and my brand
- Suggest products and services that aid solve the reader’s query
Setting up the autoresponder is extremely simple and is no different than sending a regular email. If you are using Aweber, all you have to do is click “Follow Up” on the Message tab. This will allow you to create a follow-up message to send to your new subscriber at a later time. Aweber allows you to set up an unlimited number of autoresponders.
Follow the money save in the Clickbank account
Visit the blog page for more interesting Blog posts


